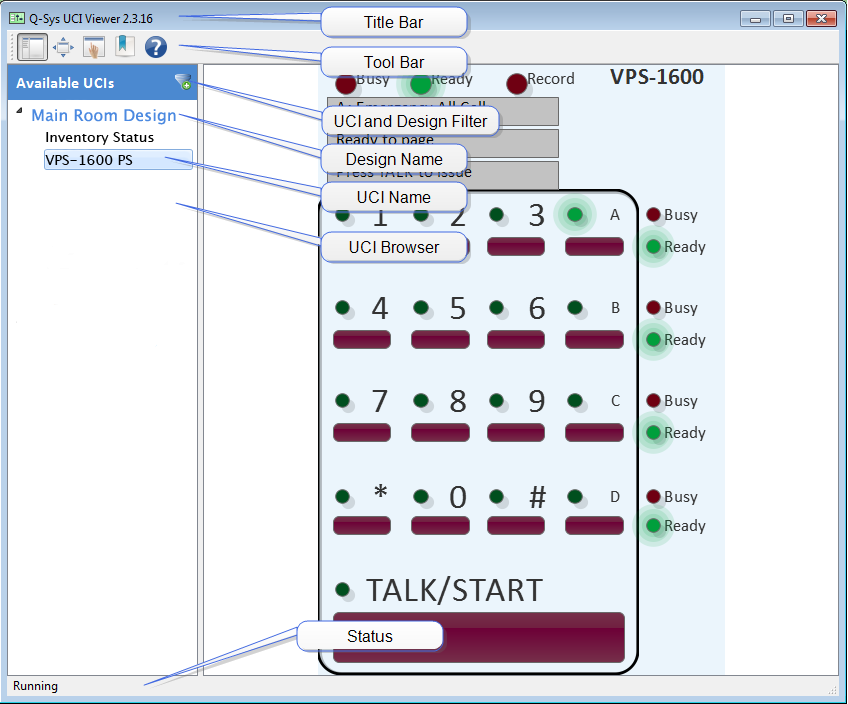
The User Control Interface (UCI) Viewer is a stand-alone, Windows based application used to discover and run Q-SYS UCIs over a local area network.
For information about designing UCIs, refer to the Q-SYS Designer online help.
The Q-SYS UCI Viewer for Windows is available on the QSC web site (http://qsc.com) as part of the Q-SYS Software download. You can save the downloaded .exe file and copy it to as many Windows devices as necessary, then run/install it on each device. It is highly recommended that you download and install the same version UCI Viewer as your Q-SYS Designer. The number, for example "3.3.xxx", in the file name indicates the version.
NOTE: For remote access, refer to the section titled "Remote Access with Q-SYS UCI Viewer" below.
NOTE: Hover over the Current Design name to see information about the Core running the design, or the PC Emulating the design.
If you want a UCI to automatically run when Windows starts:
Because the UCI Viewer runs on a Windows based PC, many of the Windows functions work with the UCI Viewer. You can use your mouse to make selections, or if a touchscreen is available, you can use that as well. The UCI Viewer supports multi-button press sliding. Press and hold a button, then slide your finger or mouse over other buttons to change their states to match the first button you pressed.

|
Control |
Function |
|---|---|
|
UCI Selection Panel (show/hide)
|
Clicking this icon shows or hides the UCI Selection panel. The default is show. |
|
Full Screen
|
Clicking this icon enters or exits the UCI Viewer full-screen mode.
|
|
Touchscreen Control Mode (on/off)
|
Click this button to change the UCI display to Touchscreen Control mode. In Touchscreen Control mode, hovering and text entry are disabled, the mouse cursor is not visible. When the UCI Viewer is in Touchscreen Control mode, the login screen is a pin-pad instead of a dialog box. Touchscreen Control mode does not disable the mouse cursor over the toolbar, or the UCI Selection Panel. Touchscreen Control Mode is persistent. If you enable Touchscreen Control mode, close the UCI Viewer then reopen it, Touchscreen Control Mode is still enabled. However, Bookmark settings take precedence. You can save a UCI in Touchscreen Control mode as part of a Bookmark. |
|
Bookmark
|
Clicking this icon saves information about the currently running UCI, and the desired view of the UCI Viewer.
|
|
UCI and Design Filter
|
Clicking this icon gives you two fields "UCI", and "Design", with which you can filter the list of UCIs or Designs. Wildcard matching is case sensitive, and uses the following rules:
|
|
Toolbar (Hide)
|
Click the Toolbar button to hide the toolbar. Right-click, or touch-and-hold (Win 7/8) a menu displays. Click or touch Toolbar to restore the Toolbar. |
|
Help
|
Displays this help file. |
You can configure your Windows PC to allow the UCI Viewer to discover and connect to a remotely located Core. The PC running the UCI Viewer must have network connectivity with the Core(s) to which you wish to gain remote access. This can be via VPN or some other method suggested by your friendly network administrator.
The UCI Viewer needs to be able to reach the following ports on the target Core:
In addition, the UCI Viewer must be able to exchange ICMP (ping) echo messages with the Core. There are separate firewall settings to enable or filter these messages. You can test network connectivity by pinging the Core(s) from your PC using the Windows command line interface (cmd.exe) and the Core's IP Address. The format is ping 123.45.6.789. If you get a good response, (for example: "Reply from 123.45.6.789: bytes=32 time<1ms TTL=64) you have the proper connectivity.
IMPORTANT: Do not use this method if your PC can already discover the UCI Viewers on the Core, that is, receive multicast packets from the Core in question.
NOTE: If Q-SYS Designer resides on the same PC as the UCI Viewer, you can use Q-SYS Designer Preferences dialog to manage the hardlink.xml file.
NOTE: The name of the file is "hardlink.xml" singular. The tag inside the file is <HardLinks> plural.
<HardLinks>
<IpAddress>nnn.nn.n.nn</IpAddress>
<IpAddress>nnn.nn.n.nn</IpAddress>
</HardLinks>
Where nnn.nn.n.nn is the IP Address of the Core to which you wish to connect. You may include multiple IP Addresses.
© 2009 - 2016 QSC, LLC. All rights reserved. QSC and the QSC logo are trademarks of QSC, LLC in the U.S. Patent and Trademark office and other countries. All other trademarks are the property of their respective owners.
http://patents.qsc.com.
![]()


 Related Topics